|
Appointing an IHO
Relevant New York State Regulation(s):
- 8 § NYCRR Part 200.2(e)
- 8 § NYCRR Part 200.5(j)
School District Responsibility
-
The board of education of each school district must establish administrative
policies and procedures for the selection and appointment of an
Impartial Hearing Officer (IHO). See Getting Started - Impartial Hearing Process: Responsibilities
for Data Reporting and Monitoring for more information
on school district responsibilities regarding impartial hearings.
-
The school district shall begin contacts with IHOs for appointment
selection immediately but not later than two business days after
receipt of the written request for a hearing.
-
The school district shall contact the IHO in alphabetical order
according to a rotational list beginning with the first name appearing
after the IHO who was last appointed to serve. The district's continuously
updated version of the Impartial Hearing Officer Rotational List
is available on the Impartial Hearing Reporting System (IHRS). The
selection of an IHO from the IHRS rotational list begins with the
first name appearing at the top of the list. This list is automatically
maintained in rotational order as IHOs appointments are recorded
in IHRS. See Accessing the IHO Rotational
List and Contacting an IHO for more
information.
If no IHO has served, the school district shall first set their district’s Rotational List Marker. See First Time District Accesses IHRS – Setting the District Initial Marker.
-
The school district must document all IHO contacts in a way that
can be independently verified. This is important in the event an
IHO (or parent) questions whether the district has appropriately
followed the rotational list. Independently verifiable documentation
can include requests and responses conveyed via facsimile, electronic
mail or certified overnight mail, and telephone contacts that are
recorded and confirmed in writing. The school district must ensure
there is a mechanism in place to receive the IHO's response within
the 24-hour period. The IHRS provides an electronic method of
maintaining the required contact documentation. SED encourages the
district to use this mechanism. See Steps
to Enter IHO Contact Information.
-
During the appointment selection process the school district may
ask an available IHO:
-
To ensure that his or her schedule is such that any sufficiency
challenges may be determined by the IHO within 5 calendar days
upon receipt of request.
-
Whether the IHO will be available to initiate the hearing timeline
within 1 calendar day after the conclusion of the Resolution Period
or if the school district is unable to obtain participation of
the parent(s) in the resolution meeting after reasonable efforts
are made and documented.
- The school district may request the Board of Education (BOE) Designee
to appoint an IHO in order to expedite the immediate appointment of
an IHO.
BOE Designee
A board of education may elect to designate the appointment process
to one or more of its members so that the appointment can occur immediately.
If the board of education does not elect this option, it must immediately
(i.e., without delay) convene as a full board to appoint the IHO since
an impartial hearing cannot be convened until a board of education appointment
is made. The regulations do not permit a delay in the appointment of
the IHO. In the event the board does not have a regularly scheduled
meeting at the time the IHO is selected, the board of education must
convene a special meeting for the purpose of appointing the IHO.
IHO Responsibility
-
The IHO shall respond within 24 hours to a district contact regarding
availability to serve as an IHO.
-
If the IHO fails to respond the district may move on to the next
available IHO.
-
The IHO must be available to conclude the hearing process within
45 calendar days unless extensions are granted at the request of
either party (30 calendar days for preschool hearings and 15 business
days for expedited hearings).
For more information on IHO responsibilities, please see Getting
Started - Impartial Hearing Process: Responsibilities for Data Reporting and Monitoring.
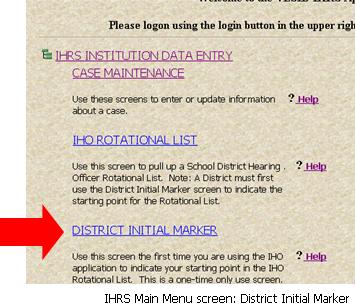
First Time District Accesses IHRS - Setting the District Initial Marker
The district sets its rotational marker ONE TIME ONLY and occurs before
the district enters their first impartial hearing case. The marker sets
the starting point in your district rotational list in IHRS. Thereafter,
the marker is moved automatically when you appoint an IHO to a case.
The appointed IHO moves to the bottom of the list and the next IHO in
the list moves up to the top of the list.
Steps to Set District Initial Marker |
Step 1. |
Log onto IHRS |
 |
Step 2. |
On the IHRS Main Menu screen, find and click on District
Initial Marker located under the IHRS Data Entry header.
A list of IHOs will appear, if your district's rotational list
marker has not been set you will see an "N" under
the Marker column by each IHO name. If you do not see a list of IHO's after clicking on District
Initial Marker, please contact the VESID office at 518-473-0170
or vesidih@mail.nysed.gov
for assistance. |
Step 3. |
Find and click on the IHO Identifier number
for the last IHO appointed to a case for your district.
If your district has never had an impartial hearing, click on
the last IHO Identifier number on the list.
|
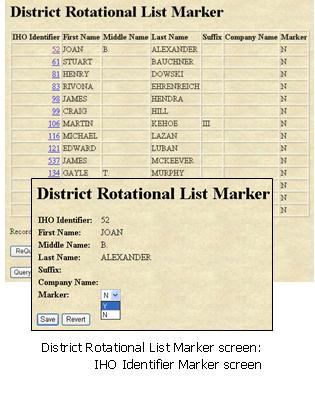 |
Step 4. |
Next to the Marker: field, click the arrow on
the drop down box and select "Y".
|
Step 5. |
Take a look at your selection to make sure it is accurate. |
Step 6. |
Click Save. |
Step 7. |
A "Success!" message appears at the top of the screen indicating
that the district rotational list marker has been successfully
set. If this does not occur, the resulting error message will
provide guidance about next steps.
Note: If you do not receive either a "Success"
message or a resulting error message, click Refresh
on your browser's toolbar to confirm your data was entered and
saved.
|
Step 8. |
Click on Menu on the navigation bar at the top
of the screen to return to the IHRS Main Menu. |
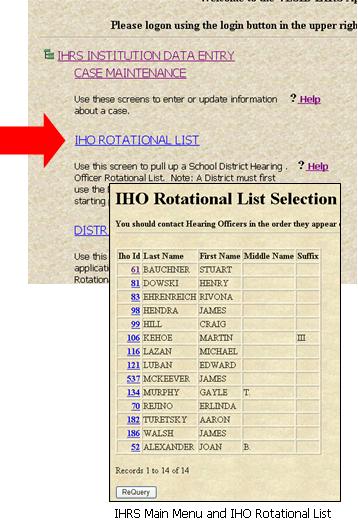
Accessing the IHO Rotational List
Each school district must appoint from a current rotational list of
certified and active IHOs in New York State. The district-specific rotational
list in IHRS is designed to help districts meet this regulatory requirement
(except New York City where they maintain their own IHO rotational list).
The IHO Rotational List is specific to your school district, that is,
you will not be able to access a list of IHOs serving another school
district.
Each IHO may be eligible to serve in one or more counties, a county
listing is shown for each IHO by clicking on the IHO ID associated with
the IHO's name on the list.
Steps to Access IHO Rotational List |
Step 1. |
Log onto IHRS |
 |
Step 2. |
On the IHRS Main Menu screen, find and click on IHO Rotational
List located under the IHRS Query header. A list of IHOs
will appear starting with the next IHO available for appointment
at the TOP of the list. The district must contact the IHO in the
order displayed on this list. |
|
Step 3. |
Click on Menu on the navigation bar at the top
of the screen to return to the IHRS Main Menu.
Note: If a list of IHOs does not appear after
clicking on IHO Rotational List from the IHRS Main Menu screen
this may mean that your district's initial marker has not been
set. See First Time District Accesses IHRS - Setting the District Initial Marker for more
information. |
|
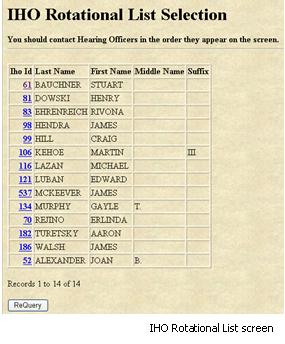
Contacting an IHO from the IHO Rotational List
The IHO Rotational List screen is used to identify
which IHOs are next in line to be contacted for appointment. The name
of the most recently appointed IHO will appear at the bottom of the
list. Contact the IHO at the top of the rotational list
first, then proceed down the list in order.
Note: Districts are discouraged from printing a copy
of the IHO Rotational List for reference, as IHO names may be added
or deleted from the list though out the year. Instead, SED recommends
logging onto the IHRS for each new case.
This window is updated automatically when:
-
You appoint an IHO (The appointed IHO moves to the bottom of the
list).
-
VESID adds a new IHO to your county.
-
VESID inactivates/reactivates an existing IHO in your county.
The school district may simultaneously contact several IHOs to determine
their availability, but the selection of the IHO must be based on the
rotational list, regardless of which IHO responds first. For example:
-
IHO 1 was not available; you have left a message
for IHO 1 to return your call regarding appointment.
The IHO has 24 hours to respond.
-
IHO 2 has declined appointment. You may move on
to IHO 3.
-
IHO 3 was available and has accepted appointment.
You notify IHO 3 that you are waiting to hear from
a previous IHO on your district's rotational list and will contact
him or her with the result.
-
If IHO 1 calls and declines the appointment or
does not respond with 24 hours, you may contact IHO 3
to arrange the appointment. You may not go back to IHO 2
for appointment to any later impartial hearing requests your district
may receive after this request. In this case, after IHO
3 is appointed, IHRS will move IHO 1,
IHO 2 and IHO 3's name to the
bottom of the rotation list.
-
If IHO 1 calls within 24 hours and accepts the
appointment you may make arrangements for the appointment. After
appointing IHO 1 IHRS moves his or her name to
the bottom of the rotation list. Notify IHO 3 that
a previous IHO has accepted appointment. IHO 2
and IHO 3 remain next on the list for appointments
to later impartial hearing requests.
Steps to Access Contact Information from the IHO Rotational
List |
Step 1. |
Log onto IHRS |
 |
Step 2. |
On the IHRS Main Menu screen, find and click on IHO Rotational
List located under the IHRS Query header. A list of IHOs
will appear starting with the next IHO available for appointment
at the top of the list. |
Step 3. |
Click on the IHO Id number to access the specific
IHO's contact information. |
Step 4. |
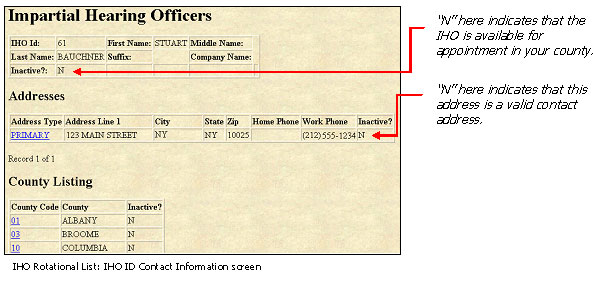
You may record or print out the contact information to refer
to when contacting the IHO. Some IHOs maintain two addresses.
Use the Primary address first to contact the
IHO.
Do not use any address that has a "Y" in the
Inactive? field in the address line. The Y
indicates that the address is inactive. See IHO
Inactive? for more information. |
| |
 |
|
If you choose to contact the IHO at this time, please be sure
to also record the following:
-
Contact Date and Time
-
Contact Method (i.e., Home Phone, Work Phone, Email)
-
Result Date and Time
-
Result of Contact (i.e., accepted, declined, no response)
This information may later be recorded in the Hearing
Officer Contact Information section of the new case you
have opened. Although this information is not required it is helpful
in keeping an accurate case record in case any questions may arise.
Please see Steps to Enter IHO
Contact Information for more information.
|
Step 5. |
Click on Menu on the navigation bar at the top
of the screen to return to the IHRS Main Menu. |
IHO Inactive?
IHOs who have served on the SED list at some point but have become
inactive (e.g., removed themselves, deceased, etc.) remain on the list
as "inactive." They are left on the list, as the district may need to
access information regarding past cases for data analysis purposes.
Inactive IHOs are indicated with a "Y" in the Inactive?
field.
Steps to Enter IHO Contact Information |
Step 1. |
Log onto IHRS
|  |
Step 2. |
Find and open the specific case you wish to add IHO Contact information. |
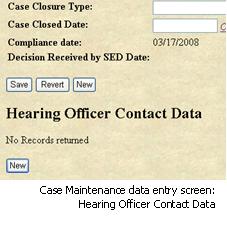
Step 3. |
Scroll down to the Hearing Officer Contact Data heading and click on the New button shown under
the heading. |
Step 4. |
Click on the List button next to the IHO
Identifier field. An IHO List pop-up window will appear.
Click on the IHO ID number next to the name of
the IHO you wish to select. |
Step 5. |
Click on the CAL button next to the Contact
Date field and enter the date you contacted the IHO.
Note: For the Contact Date and Result Date fields please enter a 2 digit
month/2 digit day/4 digit year. For example, Result Date: 03/18/2008. |
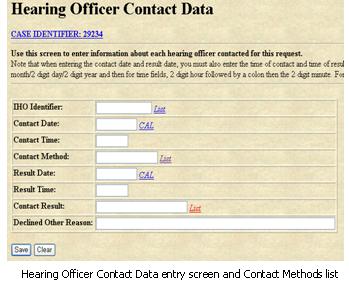 |
Step 6. |
Enter the Contact Time.
Note: For the Contact Time and Result Time fields please enter (in military
time to the nearest half hour) a 2 digit hour, colon (:), 2 digit
minute. For example, Result Time: 14:30. |
Step 7. |
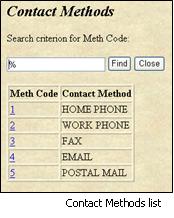
Click on the List button next to the Contact
Method field and select the mode of contact. (i.e., Home
Phone, Work Phone, Fax)
|
|
Step 8. |
Take a look at your data to make sure it is accurate.
|
Step 9. |
Click Save. |
Step 10. |
A "Success!" message appears at the top of the screen indicating
that the IHO Contact information has been successfully entered.
If this does not occur, the resulting error message will provide
guidance about next steps.
|
| |
Note: If you do not receive either a "Success" message
or a resulting error message, click Refresh on
your browser's toolbar to confirm your data was entered and saved.
Please see the Troubleshooting
Checklist in this section for more information. |
Step 11. |
Click on the Case Identifier: [Case No.] link
at the top of this screen to return to the Case Maintenance screen
or click on Menu to return to the IHO Main Menu. |
Steps to Enter IHO Contact Information Once the IHO has Returned
the District's Contact Regarding an Appointment |
Step 1. |
Log onto IHRS |
|
Step 2. |
Find and open the specific case you wish to add IHO Contact information. |
|

|
| |
Step 3. |
Scroll down to the Hearing Officer Contact Data
heading and click on the IHO Identifier button
next to the name of the IHO you wish to edit shown under the heading. |
|
Step 4. |
Click on the CAL button next to the Result
Date field and enter the date the IHO responded. Click
on the List button next to the Result
Time field and enter the time the IHO responded. |
|
Step 5. |
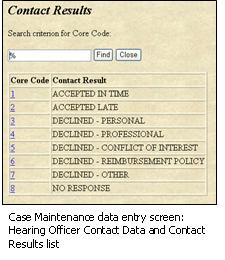
Click the List button and select a Contact
Result. (i.e., Accepted, Declined, No Response). If the
IHO has declined appointment for other reasons than those listed
please enter a brief reason for declination in the Declined
Other Reason field. |
 |
Step 6. |
Take a look at your data to make sure it is accurate. |
|
Step 7. |
Click Save. |
|
Step 8. |
A "Success!" message appears at the top of the screen indicating
that the IHO Contact information has been successfully entered.
If this does not occur, the resulting error message will provide
guidance about next steps.
Note: If you do not receive either a "Success"
message or a resulting error message, click Refresh
on your browser's toolbar to confirm your data was entered and
saved.
Please see the Troubleshooting
Checklist in this section for more information. |
|
Step 9. |
Click on the Case Identifier: [Case No.] link
at the top of this screen to return to the Case Maintenance screen
or click on Menu to return to the IHO Main Menu. |
|
Appointing an IHO
You must complete contact and contact result information for all contacted
IHOs before recording the appointment of an IHO.
The board of education must immediately appoint the IHO who was selected
from the rotational list. A board of education may designate one or
more of its members to appoint the IHO on behalf of the board, see BOE Designee. An IHO must accept within 24 hours to be
appointed.
Steps to Enter an IHO Appointment |
Step 1. |
Log onto IHRS |
|
Step 2. |
Find and open the specific case you wish to add an IHO appointment. |
|
Step 3. |
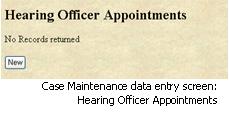
Scroll down to the Hearing Officer Appointments
heading and click on the New button shown under
the heading. |
 |
Step 4. |
Click on the List button next to the IHO
Identifier field, an IHO List pop-up window will appear.
Click on the IHO Id of the IHO the Board of Education
(BOE) approved for appointment. |
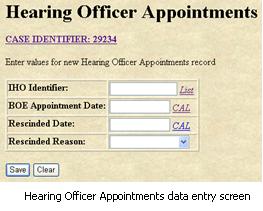 |
Step 5. |
Click on the CAL button next to the BOE
Appointment Date field and enter the date the BOE approved
the IHO appointment.
Note: Information in the Rescinded Date
and Rescinded Reason fields should only be entered
if the district has rescinded the IHO's appointment.
Please see Steps to Rescind an IHO
Appointment for more information. |
|
Step 6. |
Take a look at your data to make sure it is accurate. |
|
Step 7. |
Click and Save. |
|
Step 8. |
A "Success!" message appears at the top of the screen indicating
that the IHO appointment has been successfully entered. If this
does not occur, the resulting error message will provide guidance
about next steps.
Note: If you do not receive either a "Success"
message or a resulting error message, click Refresh
on your browser's toolbar to confirm your data was entered and
saved.
Please see the Troubleshooting
Checklist in this section for more information. |
|
Step 9. |
Click on the Case Identifier: [Case No.] link at the top
of this screen to return to the Case Maintenance screen or click
on Menu to return to the IHO Main Menu. |
|
Recuse or Rescind an IHO Appointment
Recusal of IHO Appointment
The IHO may recuse him or herself from a case. As per the Administrative
Law Judge Manual, the IHO must recuse him or herself after appointment
if the IHO has a personal bias or prejudice or familiar relationship
concerning a party or witness, or personal knowledge of disputed evidentiary
facts concerning the proceeding.
If either party to the hearing believes there is a potential conflict
of interest or concern regarding impartiality with the IHO who has been
appointed, they may ask the IHO to recuse him or herself. The IHO must
hear the argument and decide whether or not to be recused.
-
In the event the IHO is recused from the hearing the school district
must select and appoint another IHO immediately.
-
In the event the IHO is not willing to be recused, either party
to the hearing may appeal such decision to the State Review Office
(SRO) once the final decision of the IHO has been rendered on the
case.
Steps to Recuse an IHO Appointment |
Step 1. |
Log onto IHRS |
|
Step 2. |
Find and open the specific case you wish to add the IHO recusal data. |
Step 3. |
Scroll down to the Hearing Officer Appointments
heading and click on the IHO Identifier of the
IHO to be recused shown under the heading. |
 |
Step 4. |
Click on the New button under the Hearing
Officer Recusal Data section. |
 |
Step 5. |
Click on the CAL button next to the Recusal
Request Date field and enter the date the party has requested
the IHO recusal. |
Step 6. |
Click on the List button next to the Requestor
field and enter the party requesting the IHO recusal. |
Step 7. |
Enter a brief recusal reason in the Recusal Reason
field. |
Step 8. |
Click on the drop down arrow on the Recusal Granted?
field and indicate whether the recusal was granted by entering
a "Y" or "N". |
Step 9. |
Click on the CAL button next to the Recusal
Effective Date field and enter the date the recusal was
granted. |
Step 10. |
Take a look at your data to make sure it is accurate. |
Step 11. |
Click Save. |
Step 12. |
A "Success!" message appears at the top of the screen indicating
that the IHO recusal has been successfully entered. If this does
not occur, the resulting error message will provide guidance about
next steps.
Note: If you do not receive either a "Success"
message or a resulting error message, click Refresh on your browser's
toolbar to confirm your data was entered and saved.
Please see the Troubleshooting
Checklist in this section for more information. |
Step 13. |
Click on the Case Identifier: [Case No.] link
at the top of this screen to return to the Case Maintenance screen
or click on Menu to return to the IHO Main Menu. |
|
Rescinding an IHO Appointment
If by mutual agreement of the parties, the IHO who has been appointed
is deemed incapacitated or otherwise unavailable or unwilling to continue
the hearing or issue the decision, the board of education must rescind
the appointment of the IHO and immediately appoint another IHO in accordance
with the rotational selection and appointment procedures described above.
Steps To Rescind An IHO Appointment |
Step 1. |
Log onto IHRS |
|
Step 2. |
Find and open the specific case you wish to add IHO rescind data.
| |
Step 3. |
Scroll down to the Hearing Officer Appointments
heading and click on the IHO Identifier of the
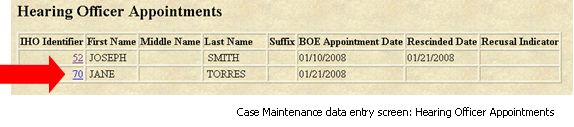
IHO to be rescinded shown under the heading. |
|
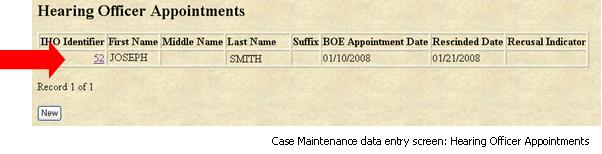 |
Step 4. |
Click on the CAL button next to the Rescinded
Date field and enter the date the BOE rescinded the IHO
appointment. |
|
Step 5. |
Click on the drop down arrow on the Rescinded Reason
field and select the reason the appointment was rescinded. |
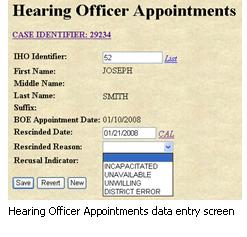 |
Step 6. |
Take a look at your data to make sure it is accurate. |
|
Step 7. |
Click Save. |
|
Step 8. |
A "Success!" message appears at the top of the screen indicating
that the IHO rescind data has been successfully entered. If this
does not occur, the resulting error message will provide guidance
about next steps.
Note: If you do not receive either a "Success"
message or a resulting error message, click Refresh
on your browser's toolbar to confirm your data was entered and
saved.
Please see the Troubleshooting
Checklist in this section for more information. |
|
Step 9. |
Click on the Case Identifier: [Case No.] link
at the top of this screen to return to the Case Maintenance screen
or click on Menu to return to the IHO Main Menu. |
|
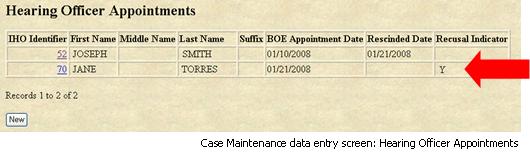
On the Case Maintenance data entry screen, under the Hearing
Officer Appointments section, you will see a Recusal
Indicator of "Y" next to the IHO's name whose appointment was
rescinded.
Troubleshooting Checklist:

When entering IHO Contact data, did you:
| |
Check that all outstanding contact data, such as Result and Result
Date/Time? You will not be able to enter appointment data if all
contact data is not entered. |
| |
Check whether case is closed? You will not be able to enter any
data (except Issue Appealed to SRO and Actual Action Completion
Date fields in Case Issues) after a case is closed. |
When entering IHO Appointment data, did you:
|
|
Check whether there are any existing appointments? A case can
not have more than one active appointment. |
|
|
Ensure that the BOE Appointment Date is not before the case request
date or is future-dated? |
When entering IHO Appointment recusal or rescission data, did
you:
|
|
Ensure the date of new IHO appointment does not overlap the
dates of other IHO appointments that have been rescinded or
recused? |
|
|
Check whether the IHO appointment has been previously rescinded
or recused? An appointment cannot be recused after it has been
rescinded and an appointment that has been previously rescinded
cannot be recused. |
|